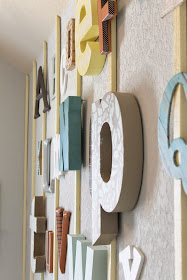
I wanted to share a fun project with you today.... Alphabet Wall Art.
I made this alphabet set, and my gals over at Dy Lynne Decor put them in this sweet little nursery. Below is a tutorial on how to make some of the letters.
How beautiful is this room?
This space feels very soft, and gender neutral.
So if you were waiting to find out the sex, this is the perfect way to go.
I also love the high ceilings, it was the perfect space for a "whole-wall" treatment.
If you don't have as much wall space, you could pull them in closer together, and spell out a name, or a small quote.
To keep a 3-D effect, they added thin strips of wood going vertical down the wall, painted in yellow.
Some of the letters actually mount to the wood.
There is a little sitting area off to one corner, with an upholstered rocker.
I also painted some simple giraffe silhouettes on round pieces of wood.
The giraffe grows bigger with each piece.
How to decorate your letters?
The possibilities are endless. Here is how to make a few that are on the wall.
To start you will need a spray adhesive, 3M makes a good one, you want a permanent bond. You will also need a glue gun, and decorative papers (wrapping paper or scrap book paper), and paints in your color scheme. You can also use stickers, ribbon and any other embellishment depending on the style of your room.
For a paper covered letter, these are the directions on how to cover it.
First, lay your letter on the paper, and trace around.
Next, cut around the letter you traced, leaving 1/2" extra for wrapping. If your letter is thick, you wont want to wrap it this way, see the next letter.
Then taking scissors, clip around the extra space, making little notches, being careful not to clip into your letter.
In the curved areas you'll need the clippings to be closer together, or have more of them (see first picture). On straight areas you only need a couple notches, if any.
At the sharp corners, cut away the excess in the middle (see the second picture).
Adding some spray adhesive to both surfaces, helps them to stick together better.
Align the letter to the traced area.
To wrap the paper around, apply a small line of glue to the edge, working in small areas at a time (the hot glue drys fast on this material). Then press the cut pieces down. Once dry, you can cut off any excess in the back.
Voila!
For the thicker letters, you can fill in the fatter edges with paper, ribbon, or burlap.
For this larger letter "t", I covered the top with dictionary pages, cut and attached like with the letter "B" (without the extra 1/2" edging). I used burlap ribbon for the edges here. It was thicker than I wanted, but I didn't cut off any excess until I was completely done attaching it. I used hot glue to attach it, but you could also use the adhesive spray.
You could also paint any of the letters, or use stencils like I did on the letter "p", or "e".
These letters were found at Micheal's, Hobby Lobby, and at the Land of Nod for the big cardboard ones (they had several styles and sizes).


No comments:
Post a Comment